Fault finding with bandsaw blades is a pivotal component in upholding the efficiency and safety of bandsaw operations. Whether your application involves a bandsaw in a woodworking shop or within a metalworking facility, it is imperative to conduct routine inspections and diagnose potential blade issues. This practice is imperative for a variety of compelling reasons.

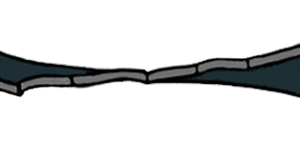
Blead Breakage
Straight break indicates failure
Probable Cause
- Incorrect blade – teeth too coarse
- Band tension too high
- Excessive feed
- Incorrect cutting fluid
- Wheel diameter too small for blade
- Teeth in contact with work before start saw
- Guides too tight
Solution
- Use finer tooth pitch
- Reduce band tension. See machine operator’s manual
- Reduce feed pressure
- Check coolant
- Use thinner blade and lower speed
- Adjust wheel alignment
- Allow 1/2″ clearance before starting cut
- See operator’s manual

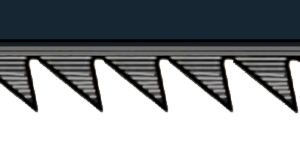
Premature dulling of teeth
Probable Cause
- Blade teeth inverted (backwards)
- Improper break-in period
- Hard spots in material (like scale)
- Material work hardened (check for hardness and adjust feed)
- Improper cutting fluid or mixture
- Speed and feed too high
Solution
- Install blade correctly
- Reduce feeds and speeds during break-in period in accordance with manufacturer’s recommendations
- Check material for actual hardness-hard spots like scale or flame cut surfaces
- Increase feed pressure
- Check coolant
- Check recommendation chart

Inaccurate cut
Probable Cause
- Teeth dull
- Over or under feed
- Improper pitch blade
- Incorrect blade (too many teeth per inch)
- Cutting fluid not applied evenly
Solution
- Use new blade
- Check recommendation chart
- Adjust coolant nozzles
- Tighten or replace guides

Leading in cut
Probable Cause
- Over feed
- Lack of band tension
- Tooth set damage
- Loose guide arms or set too far from work
Solution
- Check recommendation chart
- Check operator’s manual for correct tension
- Check material hardness
- Adjust arm close to work as possible, tighten and align
- Check machine guide

Chip Welding
Probable Cause
- Improper or lack of cutting fluid
- Wrong coolant concentration
- Excessive speed or pressure
- Incorrect blade (wrong pitch)
Solution
- Check coolant
- Reduce speed or pressure
- Check recommendation chart

Teeth fracture
back of tooth indicates work spinning in clamps
Probable Cause
- Incorrect feed and/or speed
- Incorrect blae (wrong pitch)
- Saw guides not adjusted properly
Solution
- Check recommendation chart
- Adjust or replace saw guides

Irregular break
Indicates material movement
Probable Cause
- Indexing out of sequence
- Material loose in vice
Solution
- Check for correct indexing sequence (head rise)
- Check hydraulic pressure

Teeth stripping
Probable Cause
- Feed pressure too high
- Tooth stuck in cut
- No cuttig fluid or incorrect coolant
- Hard spots scale, inclusions, etc
- Incorrect blade (wrong pitch)
- Work spinning in vice; loose “nest” or bundles
- Blade teeth running backwards
Solution
- Reduce feed pressure, see recommendation chart
- Never enter same (old blade) cut with new blade
- Check coolant table
- Check hardness. Descale and or anneal if necessary
- Check recommendation chart
- Check hydraulic pressure; be sure work is firmly held
- Reverse blade (turn inside out)

Wear on back of blades
Probable Cause
- Insufficient blade tension
- Back-up guide frozen in position, damaged or worn
- Guide arms to far apart, worn or loose
- Blade rubbing on wheel flanges
Solution
- See machine operator’s manual for correct band tension
- Reduce feed pressure, see recommendation chart
- Free pressure block and realign. If worn replace (never regrind)
- Move arms close to work as possible
- Adjust wheel alignment

Rough cut
Washboard surface vibration and/or chatter
Probable Cause
- Dull or damaged blade
- Incorrect feed and/or speed
- Lack of band support
- Insufficient band tension
- Incorrect pitch blade
Solution
- Replace with new blade
- Check recommendation chart: adjust until noise disappears
- Set guide arm properly – as close to work as possible
- Check operator’s manual for correct tensions
Wear lines, loss of set
Probable Cause
- Saw guide inserts or pulley on teeth
- Insufficient blade tension
- Hard spots
- Backing guide worn
Solution
- Check operator’s manual for correct blade with
- Check for correct blade tension
- Check material hardness
- Replace
Twisted blade
Profile sawing
Probable Cause
- Band sticking in cut
- Side guides adjusted too tight
- Work not held firmly
- Incorrect or lack of cutting fluid
Solution
- Check for over-feed, damage set, is blade too wide for radii being cut?
- Set side guides properly
- Check vice and hydraulics
- Check coolant

Blade wear
Teeth blued
Probable Cause
- Incorrect blade
- Incorrect lead or speed
- Improper or lack of cutting fluid
Solution
- Check recommendation chart
- Check coolant

Broken teeth
Front of tooth indicates work spinning in vice
Probable Cause
- Material loose in vice
- Incorrect blade (wrong pitch)
Solution
- Check hydraulic pressure
- Check recommendation chart
Effective fault finding in bandsaw blades is a crucial aspect of ensuring optimal performance and extending the lifespan of these essential cutting tools. When bandsaw blades develop faults or issues, it can lead to subpar cutting quality, increased material waste, and even potential safety hazards. Addressing faults promptly not only enhances the overall efficiency of your cutting processes but also contributes to cost savings by reducing the need for frequent blade replacements. By regularly inspecting and diagnosing faults in bandsaw blades, operators can identify issues like dull teeth, cracks, and uneven wear, allowing for timely maintenance and blade adjustments. This proactive approach aids in preventing costly downtime and production delays. Incorporating a fault-finding routine also fosters a safer working environment by mitigating the risk of blade breakage or other accidents. To ensure top-notch fault finding for bandsaw blades, consider investing in modern diagnostic tools and training to empower your team with the skills needed to spot even the most subtle irregularities. By prioritising fault finding and maintenance, your business can enjoy consistent, high-quality cuts, reduced operational costs, and enhanced worker safety. For comprehensive bandsaw blade fault finding solutions and expert insights, SawMaster has a comprehensive fault finding chart above with problems and solutions that cover a vast range of issues. Not only do our charts have the information needed to help, but the images are closely matched to what the problem would look like on a real bandsaw blade, which helps you match your blade to the issue as well.